
Cherry Cheesecake Lush is a decadent, layered dessert that combines the richness of cheesecake with the brightness of cherries, set in a no-bake, chilled format. This dessert is known for its lush, creamy texture and its ease of preparation, making it a favorite for gatherings and special occasions.
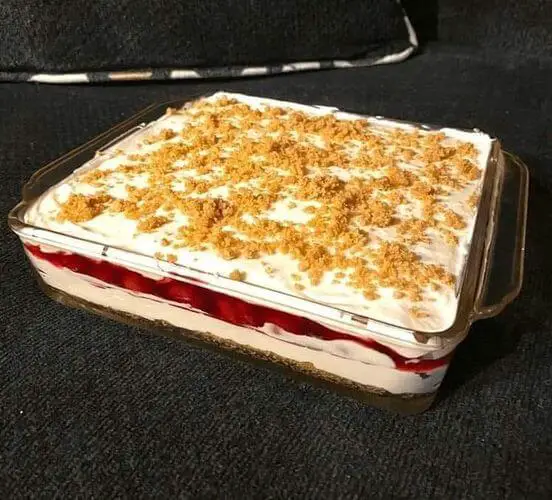
The base layer of Cherry Cheesecake Lush typically consists of a crumbly crust, often made from crushed graham crackers or digestive biscuits. The crumbs are mixed with melted butter and a bit of sugar, then pressed firmly into the bottom of a dish to form a solid foundation. This crust provides a delightful contrast in texture to the creamy layers above and adds a hint of sweetness and crunch.
The next layer is the cheesecake mixture. This is usually a blend of cream cheese softened to a smooth consistency, confectioners’ sugar for sweetness, and a bit of vanilla extract for flavor. The mixture is beaten until it is light and fluffy, creating a smooth, creamy texture. In some recipes, whipped topping or whipped cream is folded into the cream cheese mixture to add lightness and volume.
On top of the cheesecake layer, cherry pie filling is spread. The cherry filling adds a tart and sweet flavor, contrasting beautifully with the rich cheesecake layer. The cherries also add a burst of color to the dessert, making it visually appealing. The pie filling’s juicy texture complements the smoothness of the cheesecake layer.
In some versions of the recipe, another layer of whipped topping or whipped cream is added on top of the cherry layer for additional creaminess and to create a more layered look.
The dessert is then chilled in the refrigerator for several hours or overnight. This chilling time allows the layers to set and the flavors to meld together. The cool, firm texture of the chilled dessert is part of its appeal, especially as a summertime treat or a refreshing end to a meal.
Before serving, Cherry Cheesecake Lush can be garnished with additional toppings. Common choices include more cherry pie filling, fresh cherries, chocolate shavings, or a sprinkle of crushed graham cracker crumbs.
Cherry Cheesecake Lush is celebrated for its combination of flavors and textures: the buttery crunch of the crust, the smooth and rich cheesecake layer, the bright and tangy cherry topping, and the optional fluffy whipped cream. It’s a dessert that offers both visual appeal and a delightful blend of tastes, perfect for those who love the combination of fruit and cheesecake.
Ingredients
- 1-14 ounce package of golden oreos, crushed in processor
- ⅓ cup butter, salted and melted
- 1 tbsp for preparing the pan
- 8 ounces cream cheese, softened to room temp
- ¾ cup white sugar
- 16 ounces frozen whipped topping, thawed
- 2 small boxes of Cheesecake flavored instant pudding mix
- 3 cups whole milk
- 2 large cans of cherry pie filling
- 1 cup chopped pecans or chopped walnuts
How To Make Cherry Cheesecake Lush
- Butter the inside of a 9×13 baking dish and set to the side
- Crush the cookies until small crumbs form
- Add the melted butter and pulse until combined
- Place the cookie mix into the bottom of the baking dish, press down and make the layer as even as possible
- Place the crust into the freezer for 10 minutes while you make the filling.
- In a bowl beat together the cream cheese, sugar, vanilla and 1 cup of the whipped topping.
- Mix until smooth
- Spread this mixture over the cookie crust and place back into the freezer for another 10 minutes
- In another bowl combine the 2 packages of pudding mix, the milk and ½ cup of whipped topping mix. Using a whisk, whisk until it begins to thicken
- Spread the pudding over the chilled cream cheese layer, smooth evenly and chill for 30 minutes or until the pudding is set
- After 30 minutes, pour the Cherry pie filling over the pudding layer very carefully so as to not mix layers together
- Carefully spread the remaining whipped topping over the entire dessert
- Top with chopped pecans and chill for 1 to 2 hours before serving.
- Enjoy!